 :: fun toys for your iThingy & Droid
Android Activity Bar Framework
Ross Wolin, 2012.02.28
Download the complete Eclipse project ActivityBar.tar.gz from WolinLabs.com
Say you wanted to write an app for logging your exercise sessions: trail running, mtn biking, swimming, and kayaking. You might like the basic top level layout of your app to look something like this (the Mtn Biking Actitivity view label is a placeholder for your application's activity):
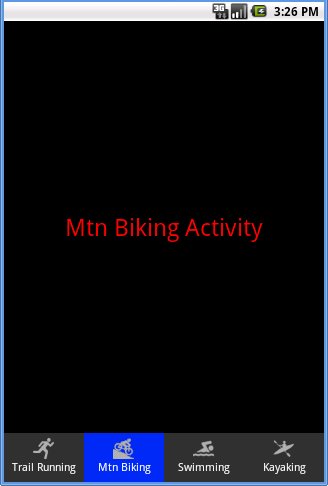
You could use a TabHost, TabWidget, and TabActivties for this design pattern, with the tabs across the screen top (note: Android has deprecated this in the latest SDK =) Instead I've made a much simpler app skeleton that puts an ActivityBar across the screen's bottom. (Change the layout if you really want the bar on top...) Pressing the buttons switches between activities.
When you press a button on the ActivityBar:
- The activity changes
- The bar stays in place
- The last button stays highlighted to indicate which activity is active
- The buttons act like a radio button group, in that only one button is lit at a time
How to Use It in Your Project
- Download the complete Eclipse project ActivityBar.tar.gz from WolinLabs.com, which contains the sample app framework
- Copy a_activity_bar.xml to your res/layout folder, and include it in the relative layout for any activity that should have the activity bar, like this:
- Copy ActivityBar.java to your project's source area. You may also need to import the com.example.ActivityBar package into any activity that uses the ActivityBar.
- In the .java source for any activity class which uses the activity bar, connect to your activity:
- Edit the connectToActivity member of ActivityBar.java to use your button ids:
- Edit the pressButtonById method to map your button ids to activity classes:
<?xml version="1.0" encoding="utf-8"?>

<RelativeLayout xmlns:android="http://schemas.android.com/apk/res/android"
	android:orientation="vertical"
	android:layout_width="fill_parent" android:layout_height="fill_parent" >

  <include layout="@layout/a_activity_bar" />

  <TextView style="@style/ActivityDebugLabelStyle"
        android:text="Mtn Biking Activity"
        android:layout_above="@id/ActivityBar"
        />

</RelativeLayout>
public class MtnBikingActivity extends Activity
{
    @Override
    public void onCreate(Bundle savedInstanceState) {
        super.onCreate(savedInstanceState);
        setContentView(R.layout.mtnbiking);

        ActivityBar.getInstance().connectToActivity(this);
    }
}
If you change the button id and activity class names, you must also:
public void connectToActivity(Activity activity)
{
    m_currentActivity = activity;

    m_arrButton.clear();
    setupButton(R.id.butTrailRunning);
    setupButton(R.id.butMtnBiking);
    setupButton(R.id.butSwimming);
    setupButton(R.id.butKayaking);
    ...
public void pressButtonById(int nIdPressed, boolean bSwitchActivity)
{
    boolean bFoundButton = false;

    ...

    //If we asked to switch activities and the button passed in was good, do it
    if (bSwitchActivity && bFoundButton && nIdPressed!=m_iCurrentButtonId && m_currentActivity!=null) {
        switch (nIdPressed) {
        case R.id.butTrailRunning:
            switchActivity(new Intent(m_currentActivity, TrailRunningActivity.class));
            break;
        case R.id.butMtnBiking:
            switchActivity(new Intent(m_currentActivity, MtnBikingActivity.class));
            break;
        case R.id.butSwimming:
            switchActivity(new Intent(m_currentActivity, SwimmingActivity.class));
            break;
        case R.id.butKayaking:
            switchActivity(new Intent(m_currentActivity, KayakingActivity.class));
            break;
     }

     ...
How it Works
The included layout for the ActivityBar (a_activity_bar.xml) is a linear layout with four buttons. This layout is designed to be inside a relative layout for each Activity that should display the bar, which is why layout_alignParentBottom is set.
<?xml version="1.0" encoding="utf-8"?>

<LinearLayout xmlns:android="http://schemas.android.com/apk/res/android"
    style="@style/ActivityBarStyle" android:id="@+id/ActivityBar"
    android:layout_alignParentBottom="true">

    <Button
        style="@style/ActivityButtonStyle"
        android:id="@+id/butTrailRunning"
        android:drawableTop="@drawable/run"
        android:text="Trail Running"
        />

    <Button
        style="@style/ActivityButtonStyle"
        android:id="@+id/butMtnBiking"
        android:drawableTop="@drawable/mtnbike"
        android:text="Mtn Biking"
        />

    <Button
        style="@style/ActivityButtonStyle"
        android:id="@+id/butSwimming"
        android:drawableTop="@drawable/swim"
        android:text="Swimming"
        />

    <Button
        style="@style/ActivityButtonStyle"
        android:id="@+id/butKayaking"
        android:drawableTop="@drawable/kayak"
        android:text="Kayaking"
        />

</LinearLayout>
The layout for eachsample activity looks like this (it pulls in the layout of the ActivityBar via an include.) You would replace the TextView with whatever control layout your Activity uses
<?xml version="1.0" encoding="utf-8"?>

<RelativeLayout xmlns:android="http://schemas.android.com/apk/res/android"
    android:orientation="vertical"
    android:layout_width="fill_parent" android:layout_height="fill_parent" >

    <include layout="@layout/a_activity_bar" />

    <TextView style="@style/ActivityDebugLabelStyle"
        android:text="Mtn Biking Activity"
        android:layout_above="@id/ButtonBar"
        />

</RelativeLayout>
Incidentally, the reason for the a_ in a_activity_bar.xml naming convention has to do with the way resource files are compiled. The activities' layouts include/refer to the activity bar layout, but if the activity bar layout isn't compiled first, you'll get errors from the activities' layout resource files. The order the resources is compiled is alphabetical, so my hack was to prefix the ActivityBar layout name with a_ to force it to compile first.
Because the buttons indicate which activity is running, I disabled the title bar in each activity layout, to save screen real estate. This is accomplished via the manifest file:
<?xml version="1.0" encoding="utf-8"?>
<manifest xmlns:android="http://schemas.android.com/apk/res/android"
   package="com.example.activitybar" android:versionCode="1" android:versionName="1.0" >

   ...

   <activity android:name=".TrailRunningActivity"
        android:label="TrailRunning"
        android:theme="@android:style/Theme.NoTitleBar" />
   ...
In this example there is only one ActivityBar: to simplify things I made it a global singleton, meaning any object can access the ActivityBar via:
ActivityBar ab = ActivityBar.getInstance();
We want to run one activity at a time, i.e. we don't want the activities to stack up for Back Button navigation, etc, so every time we switch activities in ActivityBar.java, we call finish() on the current one:
protected void switchActivity(Intent i) {
    m_currentActivity.startActivity(i);
    m_currentActivity.overridePendingTransition(0,0);		//No animation
    m_currentActivity.finish();								//We want to replace the current activity, not stack them
}
There's is a bar in the same position on each activity's layout, so we don't want an animation when the activities switch. Instead, we'd rather create the illusion the view above the bar changes, but the bar never moves. I accomplished this by disabling animations between transisitons:
protected void switchActivity(Intent i) {
    m_currentActivity.startActivity(i);
    m_currentActivity.overridePendingTransition(0,0);		//No animation
    m_currentActivity.finish();								//We want to replace the current activity, not stack them
}
Lastly, we don't want the buttons in the ActivityBar to work like normal Android Buttons, we want the set to act like a radio button group. We override the onTouch member via setOnTouchListenter for each button in the bar so that all of the motion events are consumed and the Buttons never see them, then we manually change the button backgrounds on each press to show which button is active, and switch activities when the button is pressed:
protected void setupButton(int id)
{
    Button but = (Button)m_currentActivity.findViewById(id);
    m_arrButton.add(but);
    but.setOnTouchListener(new OnTouchListener() {
        @Override
        public boolean onTouch(View v, MotionEvent me) {
            if (me.getAction() == MotionEvent.ACTION_UP)
                pressButtonById(v.getId(), true);
            return true;    //Consume the motion event
        }
    });
}


public void pressButtonById(int nIdPressed, boolean bSwitchActivity)
{
    boolean bFoundButton = false;

    //Unpress all the buttons except the one we passed in
    for (Button bt : m_arrButton) {
        if (nIdPressed == bt.getId()) {
            bFoundButton=true;
            bt.setBackgroundResource(R.color.activity_bar_button_selected);
        }
        else {
            bt.setPressed(false);
            bt.setBackgroundResource(android.R.color.transparent);
        }
    }


    //If we asked to switch activities and the button passed in was good, do it
    if (bSwitchActivity && bFoundButton && nIdPressed!=m_iCurrentButtonId && m_currentActivity!=null) {
        switch (nIdPressed) {
        case R.id.butTrailRunning:  switchActivity(new Intent(m_currentActivity, TrailRunningActivity.class)); break;
        case R.id.butMtnBiking:     switchActivity(new Intent(m_currentActivity, MtnBikingActivity.class)); break;
        case R.id.butSwimming:      switchActivity(new Intent(m_currentActivity, SwimmingActivity.class)); break;
        case R.id.butKayaking:      switchActivity(new Intent(m_currentActivity, KayakingActivity.class)); break;
        }
    }

    m_iCurrentButtonId = bFoundButton ? nIdPressed : -1;
}
Send comments, questions, money in large denominations, etc to android at wolinlabs.com
If you enjoyed this article, please consider buying my products ...

|

|
|
ATX PS Adapter
Use an ATX PC power supply as a 5V, 3.3V, and +12V/-12V bench supply the easy way, without cutting the case or mounting external connectors, resistors, LEDs, switches, and fuses. Provides visual indication when supply is plugged in and turned on, also fuses the power voltage outputs for safety. Run USB powered development boards via the USB connectors on the 5V line. |
Ultimate Serial Port (Debug Buddy)
USB serial port with standard, 5V and 3V RS232, plus integrated null modem and gender changer. Implements TX/RX and RTS#/CTS# for optional hardware handshake. Also includes 3.3V<->5V level shifters, debug LEDs, and 13 clock sources. Valuable tool for hands on problem solving and hacking |